Merry Christmas!

Wednesday, December 25, 2013

To you…and yours!

Amelia Rose

Thursday, December 19, 2013

I have stared at this blank window for 37 minutes. I've written, erased, written, reworded, erased, written, erased. It is just so hard to transcribe my emotions.


You were due on the anniversary of my miscarriage. I was told you probably had Spina Bifida, that you'd be paralyzed and that I should prepare myself for anencephaly. We waited 23 days to see a genetic counselor. We waited 23 days for a diagnostic ultrasound. There was a mass on my placenta that we needed to hope would not become vascular and cause you to go into cardiac arrest. I spent 3 days in neuro ICU after pregnancy hormones triggered a migraine so severe that they thought I had a stroke. 3 CT scans and one MRI. Topped off with a Pitocin induction and an epidural that did not work.

All of that bad news meant nothing.


You are so smart. And seriously, so funny. You have a voice and you don't let people forget it. The three of us are wrapped around your finger and we don't even mind. We miss you when you're sleeping. You are an incredibly special little girl and you have been from the start.

Happy 1st Birthday, baby. Mama loves you.

Balsamic Chicken

Tuesday, December 17, 2013


This is one of my favorite recipes to make. It's quick, easy, pretty healthy and something my family asks for over and over.

Ingredients
3- 4 chicken skinless, boneless chicken breasts, cut in half.
1- 2 pints of cherry tomatoes.
1 small purple onion, diced.
1/2 cup fresh basil, cut into ribbons.
1/4 cup balsamic vinegar + more to drizzle.
1 tbsp olive oil.
2-3 cloves of garlic, crushed.
Salt and pepper, to taste.

Directions
Preheat your oven to 350 degrees.
Slice the tomatoes in half, lengthwise, and toss them into a medium sized bowl.
Add diced onion, basil ribbons, crushed garlic, balsamic vinegar and olive oil to tomatoes and stir.
Place your chicken into a 9 x 13 glass pan and liberally salt and pepper them.
Drizzle a little balsamic vinegar onto the chicken.
Dump tomato mixture onto chicken.
Bake for 30 minutes or until juices run clear.

The flavors blend so well. The tomatoes become a little sweet after they are roasted and the whole dish is just light and fresh. If I'm hungry, I serve it with Trader Joes jasmine rice. Otherwise, skip it.

It's so easy. Make it!

DIY Christmas gift: Eggnog!

Thursday, December 12, 2013

If I'm being honest, the main reason I decided to try my hand at eggnog was our abundance of eggs. When I say abundance, what I really mean is that they are coming out of my ass. Our chickens deserve some kind of an award.


I love eggnog but I can only tolerate 3 sips of the stuff you buy from the store. This version? I cannot stop. The flavor is great without being too sweet. The consistency is perfect, as well. PLUS! It's super easy.

Ingredients
2 cups of milk (I use whole)
1 cup of heavy cream
1/3 cup + 1 tbsp of sugar
4 eggs, separated
1 tsp of nutmeg
3+ oz of whiskey (I use Jack Daniels Tennessee Honey)

Directions
- In a stand mixer, beat the yolks and 1/3 cup of sugar until the sugar is dissolved and the yolks have lightened in color.
- Meanwhile, combine the milk, cream and nutmeg in a sauce pan, over medium to high heat. Stirring occasionally, heat this mixture until it almost boils.
- Remove from the heat and gradually temper the yolks and sugar with the cream mixture.
- Put the whole bowl into the refrigerator to cool.
- Whip the egg whites and the tbsp of sugar in the mixer until stiff peaks form.
- Whisk the chilled mix into the egg whites.
- Add whiskey and stir.
- Pour into mason jars and share or pour into a glass and ENJOY!

I have a batch in the refrigerator, ready to go to a few guys that work with my husband. Next batch will go with us to a friend's Christmas party. No gifts, just food and booze. This eggnog with be the perfect addition. Original recipe from Alton Brown.

Salut!

Santa Spy Cam

Monday, December 9, 2013

Last year, it was Reindeer Cam. We still use the Reindeer app but this year, it's all about Santa Spy Cam.

I found it after my son insisted that our Elf of the Shelf was not real. He was not real because no one ever saw him move.

Excuse me? You're 3 and a half.

Anyway, my husband and I "set up the phone" to "spy on the elf while we were sleeping" and this is what we saw!


FREAKING AWESOME.

That's our hallway. The app lets you add an elf (or two) into real scenes from your house or wherever you need to add a little magic. My skeptical son is now psyched about Shelfie again. Whew. I asked him if he thinks Santa is real and he said yes. Which is good, because I told him that the presents stop when you stop believing in Santa!

The app is free and there are a couple of free elves. Others will cost you but are totally worth the price!


Merry Christmas!! This is not an ad!

Holiday Gift Guide: Wine Lover's Edition

Wednesday, December 4, 2013


It seems as if everyone has a gift guide for Christmas and I did not want to be left out. I don't know a lot about wine other than that I enjoy drinking it. The holidays can be a stressful time of year so I'm hoping that this helps. Here are my top picks for the oenophile in your life.


The Ultimate Wine Bottle Glass - $14
Hysterical. I saw this on Pinterest and thought it was a joke. Well, my friends, it is a reality. It's inexpensive enough to buy as a gag gift. Perfect for the woman who limits herself to one glass of wine a night. Who cares if that one glass is 750 ml?

Vino2Go Wine Tumbler- $16
A wine sippy cup! My life is complete now that I have one of these. Perfect for Merlot Moms that would love to sip their wine at the soccer game. If drinking during school functions is not your thing, this is a great cup to take camping. No spills! No bugs! BPA free!

The Corkcicle - $22
I bought this for a friend of mine a couple of years ago and she loves it. She uses it when she's enjoying her wine on the front porch with her best friend. It keeps your wine perfectly chilled. Personally, I would use it while I stumble around the backyard during the summer. Prevents spills when drinking from the bottle!

Wine Barrel Cork Cage - $24
This cork cage is a great way to keep track of your accomplishments while providing cute decor for the kitchen or dining room. I enjoy pinning cork crafts on Pinterest and this cork cage gets me one step closer to actually doing those projects. Bonus? Have friends and family add their corks so no one can comment on how many wine bottles you go through.

Wine Cork Coaster Kit - $20
Speaking of cork crafts! I was given a cork trivet kit and I enjoyed making it! This is great for the creative and crafty wino friend. You could even open the box, complete the coasters with all of your corks and wrap them up like that. No one would ever know that you bought a kit!

GoVino Wine Glass - $13
This glass is for the environmental enthusiast! It's flexible, shatterproof and most importantly, recyclable. These are unbreakable! I've put my glass down on an invisible table way too many times. This gift would eliminate the shards of glass that you miss while cleaning up the mess! They are great for parties, camping, the pool, the tub, Thursday night, whenever!

The Wine Rack - $30
Last but certainly not least, the WINE RACK! Drink your wine where you want, whenever you want to! The bra holds 25 ounces of liquid. When you're empty, avoid the awkward boob size questions by blowing some air into it. This is the perfect gift for the concert go-er or the woman who truly hates her job.

And there you have it. I hope you were able to cross at least one person off your gift list. Cheers!

Panty Liners to the Rescue

Friday, November 8, 2013

Oh, yes I did.


I'm pretty sure that I did not make this up. For the life of me, I cannot remember where I saw it but IT WORKS.

I am always so self conscious about pit stains. It goes back to high school when I raised my hand in class and the girl next to me, who was kind- of a friend, told me to keep my arms down because I had awful pit stains. She wasn't mean and didn't make fun of me to my face but I was mortified. The shirt I wore today was silk and my office is always stuffy. Just thinking about the pit stains had me sweating before I even got dressed.


I grabbed two of my U by Kotex thin liners and stuck them to the armpits of my shirt. It looked so ridiculous and funny and naturally, I tweeted about it. Some people laughed, some asked "WTF?" and others were intrigued.

I checked my shirt all day long.
No stains and they stayed where I had put them. I was impressed. I will definitely do this again. Who knew panty liners could be so useful?

Beauty is Pain

Tuesday, November 5, 2013

We all know that. A few years ago, I was Gwen Stefani blonde. I processed my hair, by myself with a $10 box of bleach. Oh, my gosh. The color was so wonderful, despite the 3rd degree burns and the subsequent clumps of hair falling out.

Anyway.

Our newspaper has a section on its website called “Seen”. A photographer goes out to local events, takes pictures of participants and posts them for everyone to see. It’s a great distraction from work, really. Who knew there were so many philanthropists and socialites in the area? I have noticed one thing that bothers the shit out of me though.

These fancy women always take their shoes off. Um, ew.


I get it y’all. I GET IT. I, too, have worn uncomfortable but fabulous shoes. I remember when I was in college and I wore 4 inch heels with my Halloween costume. I walked home one whole mile, on a drunk holiday, in a college town, through eggs/vomit/other questionable fluids……BAREFOOT. My feet hurt so bad and the booze was not helping at all. But I was 20 years old and unrefined!


I feel your pain, ladies. However, you are the Fancy Pants of the area. You donate money to charities. You Golf clap while perched next to your affluent husband. You shake hands, you kiss babies. Why the hell would you take your shoes off in a public place? Did you know that you can get Athlete's Foot from your own bath tub? Imagine all of the shit crawling around on the linoleum floor of a museum? Yikes.


Get yourself a pair of Spare Soles and call it a day. Seriously, they fit right into your glittery clutch. They also prevent you from catching a virus that has yet to be named or worse- being photographed in public without your shoes on.

Gross.


Sunday Social

Sunday, October 6, 2013

So I came across this on Ashley's site and thought it was a great way to get me into the habit of blogging more. And, it's not another recipe/ picture of food. It's the Sunday Social. JOIN IN, RIGHT MEOW.


Sunday Social


1. What were you like in middle school and high school? Tall and awkward. Seriously. I've been 5' 9" since sixth grade. My arms and legs are really long. Do you know what it's like to have your "boyfriend" stand 3 stairs up just so he could kiss you on the lips without having to ask you to bend down? Yeah.

2. What were your favorite pastimes? I played a lot of soccer and did a lot of skiing. I worked, too. I was a good teenager for the most part.

3. What songs were you obsessed with? Anything that was awful and on the radio. The same is true for my music taste today.

4. What fashion statement do you look back on and cringe? I chopped off all of my hair in 9th grade. Like, pixie cut. It was cute and it was different but that's something you do when you're older and you have boobs; not during the time in your life that you could be mistaken for a boy. (They accidentally listed my name as Eric in the year book that year! Sad face)

5. Who was your celeb crush? All of them? I specifically recall loving Carson Daly when he was relevant and hosting TRL. Way before his manorexia.

6. What was your favorite movie? It always has and always will be, The Wizard of Oz.


Ch ch ch check it out over at Ashley Lately.

My pumpkins with pumpkins!

Tuesday, October 1, 2013

Ahhhhh, October. The month that clogs your social media feeds with pictures of kids and pumpkins. Well, I'm not about to stop that shit. Here are a couple snaps of my babes. Seriously, its so hard to get two kids to sit, smile and look at you, all at the same time! Props to you photographers that make it look like cake.


My babies are the absolute best. Love.

Our Tour de Donuts has just begun. We try to visit as many orchards/patches as we can and then try to decide who has the best apple cider donuts. This weekend's farm was pretty good but one of the orchards closest to us has the best. I'm putting on my Winter weight, one dozen at a time.

What's Cooking this Week

Saturday, September 28, 2013


I'm way ahead of myself somehow and already have this week's meals planned. Usually I'm wandering around Trader Joes, eyes wide, trying to quickly come up with dinner for the next few nights. Typically, I end up with half the ingredients for 6 different meals. Not this week, my friends. Half a pot of coffee in the morning is great motivation!


My husband is home ALL TODAY AND ALL TONIGHT. We're taking the kids to play in the pumpkins and stuffing them full of cider donuts. Hopefully I remember to take a couple pictures. Enjoy the weekend!


Perfect Pot Roast - The Pioneer Woman. I've given up the packet of chemicals pot roast. :O

Greek Turkey Meatballs - Skinny Taste. Never Made these before!

Chicken and Broccoli - A Teaspoon of Happiness. A staple in our family.

Hearty Meatball Stew - Giada and The Food Network. Love anything from Giada.

Baked Pasta with Sausage & Spinach - Skinny Taste. Another one of our favorites.

Fooseball Food: Ham and Cheese Sliders

Tuesday, September 24, 2013

Well these little sammies could be made for any occasion, really. They were a big hit at my daughter's Christening. But, it's football time and the internet tells me that people like to eat while they watch football. This recipe is all over Pinterest so I'm sure you've seen it before. IT'S DANG GOOD, Y'ALL.

Photo by iPhone

They're perfect for feeding a crowd because you make 12 at once and they can be done ahead of time. The original recipe is posted on the Kings Hawaiian website. My version is listed below!

Ingredients
1 pkg Kings Hawaiian Sweet rolls
1 lb shaved ham
1/2 lb sliced cheese (I use fontina)
1 small onion, minced
1 stick of butter
1.5 Tbsp dijon mustard
1.5 tsp Worcestershire sauce
Poppy seeds to garnish

Directions
- Preheat your oven to 350 degrees.
- Melt the butter in a pan and add the onions.
- Stir until onions become translucent.
- Add mustard, worcestershire sauce and stir. Remove from heat.
- Cut the sweet rolls in half, but keep the layers intact.
- Place the bottom layer in a 9 x 13 pan.
- Add the butter mixture to the bottom half of the rolls, about a teaspoon on each roll.
- Add a layer of ham and then a layer of cheese.
- Place top half of the rolls onto the sandwiches.
- Brush the tops of the rolls with the butter mixture. Ensure that some of the onions make it up there.
- Sprinkle the rolls with poppy seeds.
- Bake the sandwiches for approx 15 minutes so the cheese is melted and the rolls are brown.
- Eat, drink and repeat.


I've been known to make these for lunch on the weekend. We seriously eat all twelve them.

I'm a little (a lot) OCD so I actually break all of the rolls apart and fold the ham and cheese so that they fit nicely on each sandwich. Yikes, I know. But listen, happy wife, happy life right? Riiiiight.

Make these for your fooseball get together this weekend or for whatever else you've got going on. Hope you love them!!

Cross it Off the List!

Sunday, September 22, 2013

One of my goals for 2013 was to run a 5K. And I finally accomplished that, yesterday!

I don't have a lot of time to myself so I run when I can and workout when I feel like it. Last year, when I was the size of a house, I promised myself that I would run one. I figured September was a realistic timeline after having a baby in December! I ran with two friends and we did it in about 30 mins. There were 1,000+ other people in our wave so we kind of ran...at a walking pace. But we did it! And it was so much fun.


Pre run selfie.


Um, I can't remember what we were sad about. Lol.


After. YAY!


We're doing it again next year, for sure!

10 Minute Pickles

Sunday, August 25, 2013

So, I've become a little obsessed with making things myself. Tomato sauce, pancake mix, taco seasoning, Ranch dressing mix and now..... pickles.

We've got cucumbers coming out of our ears, thanks to my Father In Law's incredibly green thumb (my son has been eating them for breakfast). I came across this recipe the other day and figured I'd give it a try. Besides, what the hell was I going to do with 19 cucumbers anyway?


OMG, Y'ALL. They're good. And cheap. And easy. And quick.

Ingredients
4 pickling cucumbers or 1 large English cucumber
1 tbsp salt
1.5 tbsp sugar
1/4 (heaping) tsp black peppercorns
1/4 (heaping) tsp mustard seed
1 tbsp chopped garlic (approx 4 cloves)
1/2 cup white vinegar
1 bunch of fresh dill

Directions
Slice your cucumbers, leaving the skin on. (I used my mandolin).
Put all of the ingredients into the jar.
Fill the jar with warm water, until covering the cucumbers.
Twist the lid on and shake the jar until salt and sugar are dissolved.
Refrigerate over night. Or for an hour. Or whatever...the title says 10 minutes!

Shannon has more details over on her blog, if you need them. To be honest, I used grainy Trader Joes mustard instead of mustard seeds (I dont have mustard seeds!). I also used dried dill rather than fresh. Whoops. I didn't feel like chopping garlic cloves so I subbed 2 tsp of crushed garlic which is why the jar looks so cloudy. They still turned out to be delicious!

I tasted them after an hour. I couldn't help it. And now, I want to eat them all. I don't want to share them with anyone!

Um, hello?

Tuesday, July 9, 2013

It has been a minute since I've been here.

Life is funny sometimes. You've got nothing going on and then all of a sudden, you're going in 30 different directions. I just got a promotion. Work is hectic and is about to get a whole lot crazier. That, on top of everything else the summer brings, just confirms the fact that I'm getting old. Seriously, I'm usually drooling on myself by 9:30PM. The times I've opened the laptop and logged into Blogger have not been successful (obvi). I get distracted so easily. Or, I just want to go to bed. 9 times out of 10, the bed wins. The other time, it's the wine that wins.

I have a bunch of pictures to blog, a new design to upload, recipes to post and complaints to lodge. Stick with me, friends! There's got the be a down slope soon!

My Daily Face

Tuesday, May 28, 2013


My daily face isn't anything fancy. I've been using BareMinerals since girlfriend was swirling, tapping and buffing on QVC. And, I'm pretty sure that I've worn the same shade of brown eyeshadow since 7th grade. I held off on the Naked palette for so long because of the price but its honestly worth every penny. Clearly, you can tell which color I wear every single day.


I use coconut oil as my facial moisturizer.

ELF eyelid primer: A must when using oil on your face. This primer works just as well as more expensive primers and its only $1!

Hard Candy Glamoflauge concealer: Best. Concealer. Ever. It's definitely worth the trip to Walmart. You use such a small amount so it will last you a while. I was skeptical because its only $6 but it does serious work on your face.

Bare Minerals Foundation: Most days I just use this to set my concealer. If I'm going out, I do a full face of foundation.

Bare Minerals Warmth: Bronze bronze bronze, all over the face and décolletage.

Bare Minerals Blush: In Vintage Peach.

Bare Minerals Eyeshadow: In Bahamas. It's a Glimmer, so it's very shimmery but a really fine powder. I use it all over my lid and up to my eyebrow. It's really neutral and pretty and doesn't look as bad as I'm making it sound! I swear!

Naked Palette: Buck all over my eyelid. A little bit of Darkhorse in the crease.

Sephora Collection Nano eyeliner: In coffee. Set with a little bit of Darkhourse from the Naked palette. Love this pencil and its only $5!

ELF eyelash curler: THIS IS ONLY $1. And it's my favorite curler I've had! One. Dollar.

Benefit They're Real mascara: Loveeeeee this mascara. It has a comb wand and the formula is creamy/pasty VS watery. If you want to try it out first, Sephora's birthday gift this year features a sample size of the mascara.

ELF eyebrow gel: Taming the eyebrows has made a difference in how I look. I can't rock a heavy eyebrow without looking angry so it's great that this is clear. Again, it's ELF and its only $1. No need to spend more!

Benefit Moon Beam: Just a little bit on my cheek bones, under the eyes.

Bare Minerals Buxom lipgloss: In Samantha. Not pictured, sorry!

I use brushes from Bare Minerals, Sephora and ELF. I have some other makeup for when I'm trying to look fancy but this is what I typically what you'll find me in. I'd recommend all of it to everyone. Lol.

DIY: Photo Coasters

Friday, May 24, 2013

This is one of my favorite projects to make. Relatively easy and they're a great gift, especially if you need something for the person that has everything!


This particular day, I made a set of coasters for my best friend who had just moved into her newly built house. A lot of time, coasters are a small overlooked necessity so I figured I'd make them for her. After a little Facebook stalking, I sent the 4 photos to Target to be printed.

To do this project you will need:

4 4x4 tiles, easily purchased at Home Depot (I use tumbled Travertine)
4 photos of your choice
ModPodge (I prefer Matte)
Cheap foam paint brushes
A clear spray sealer (I prefer Matte)
Small felt circles (used for the bottom of furniture feet)


Start out by trimming your photos to fit your tiles. Take your time doing this! Make sure that the subjects are centered while you're cutting. The first couple of times I did this project, I ordered 2 of every print just in case I made a mistake. They're $.19/ea so it was no big deal at all.

Next, cover the top of the tile with a thin, but decent layer of ModPodge. Carefully place the photo down on the tile, ensuring that the photo is centered, with the same amount of tile all the way around it. After all 4 tiles are complete, let them dry for 10 minutes or so.


Then, you're going to apply the ModPodge on top of the tile and the photo. The picture will look like it has a white film and you will be sad, maybe a little confused. But, have no fear. The ModPodge will start to dry and clear up. Apply 3 layers of ModPodge to the tiles, allowing 20 minutes drying time between each layer. Be careful about the amount of ModPodge you use! Too little will ruin the surface you're creating over the photo and too much will cause bubbles. You dont want it! A medium amount, applied with a steady hand yields the best results.


After all three layers are applied, move them out of harms way and let them dry overnight. You do not want any tackiness before you spray the sealer.


Lay the tiles out and spray them with your clear acrylic sealer. Allow the first round to dry and then spray them again. I know this seems like overkill but this will prevent condensation from leaving a mark or ruining the surface.

After your sealer has dried completely, flip them over and apply the tile felt pads to the back. You dont necessarily need these but it will prevent the hard tile from scratching or denting the table they are on.


Stack them, wrap them and give them away. The recipient is sure to love this easy but impressive gift!

You Glow Girl: Oatmeal Body Scrub

Monday, May 20, 2013

(Yes, I just said that)


Spring and Summer are (hopefully) on their way and that means you’ll be showing more skin. Hey, girl, hey. The winter can leave you hairy (sorry, hubs) and scaly but as the weather warms, it’s time to slough it all off. I cannot believe that stores charge (and THAT PEOPLE PAY) so much money for something that you can easily make at home, with natural ingredients that you probably already have in your kitchen. This is my Coconut Oatmeal Scrub. Oatmeal has anti-inflammatory properties and it’s great for even the most sensitive of skin. It’s moisturizing, contains natural cleansers, helps to treat eczema, rosacea and other skin rashes. And coconut oil is, well, miraculous.

Ingredients
½ cup raw oats
½ cup brown sugar
¼ cup white sugar
½ coconut oil, melted

Directions
In a food processor or a blender, chop the oats until they are small in size but not too fine, as you do not want oat flour. You want them to be small enough to fit down the drain, if they have to.
Combine the sugars and the oats in a bowl.
Pour in your coconut oil and mix well.
Use immediately or store in an air tight container. I keep mine in a Mason jar. Of course. ;)
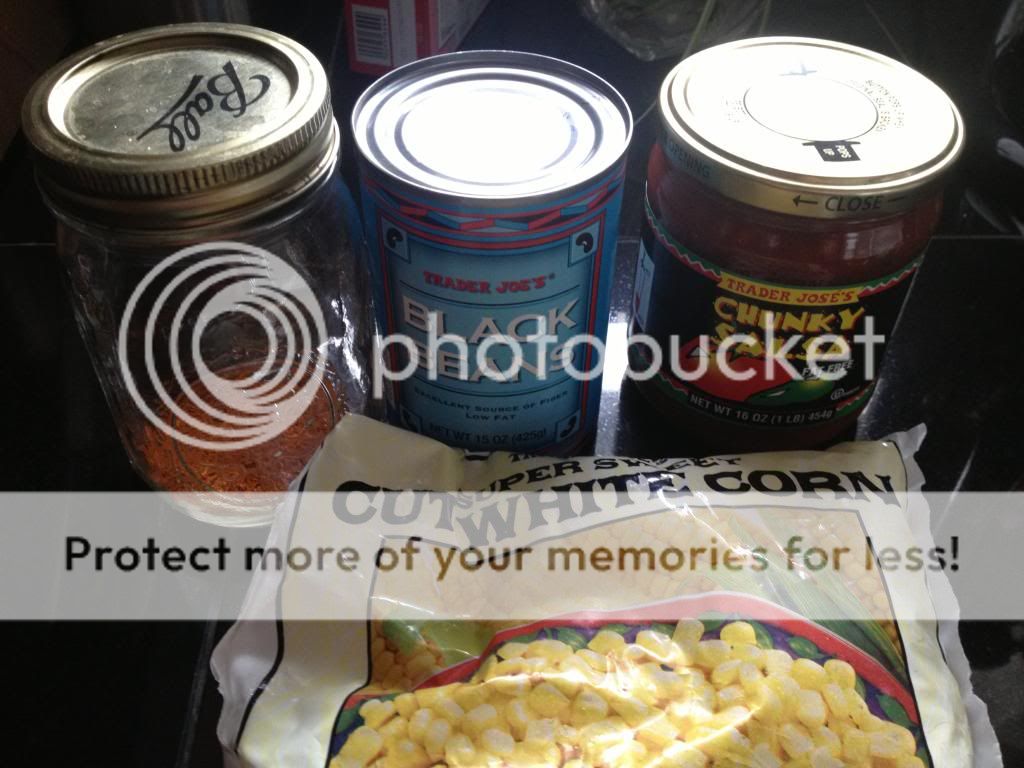

You could leave the white sugar out if you want it to be a little less exfoliating. Because Coconut oil is solid, you might have to run your jar under hot water for a few minutes before you use it. That will loosen the oats a little and make it easier to get the scrub out. Also, if you use this in the shower, be sure to rinse the tub really, really well. I don't want to be the one that makes you slip and fall!

Throwback Thursday: Things You Shouldn't Say to a Pregnant Woman

Thursday, May 16, 2013

Originally posted November 17, 2012


I don't know what it is about us pregnant women but it seems like we turn everyone into an expert, a doctor or a Class A Asshole.

I will not lie. This time around, I am absolutely miserable. I am HUGE, I can't sit for too long, I can't stand for too long, I can barely walk, I've got stretch marks, a triple chin and I just cannot shake the exhaustion. I refuse to get into the details of the crazy shit that is going on with my body. However, despite all of this, I continue on with life. I spend my day acting as if I am skipping though daisy fields, hiding the fact that I want to tear everyones damn face off. (Did I mention that my hormones are completely out of control?)

Some of the things that have been said to me have left me at a loss for words. I wouldn't say half of them to anyone, even if I was completely joking.

Wow, you are so big! No shit. This is the last thing a pregnant woman wants to hear. Especially when her maternity clothes are starting to get a little snug. I am not lying when I tell you that the Director of HR came up to my desk and said, "OMG!....ERIN!" Yes, I'm a beached whale, thanks for the reminder. And yes, there is only one in there. And yes, I know she's going to be big. And yes, I'm aware that it looks like I'm smuggling a watermelon.

You STILL haven't popped yet? Oh, yeah, this big belly is just a fake. Surprise! Come on. I am counting down the hours at this point. If YOU feel like it's taking forever, how do you think I feel?

Should you be drinking that coffee? I must have missed the MD on the end of your name. I already have a OBGYN though. Thanks anyway!

Are you going to have an episiotomy? You're going to breastfeed, right? Are you going to breastfeed? Are you going to have an epidural? You're not going to have an epidural, are you? You should stay home. You're going to go back to work? OMG, STOP IT! You're making my head explode! And why are you, a stranger, asking me questions about my vagina?

Your life is over. Clearly, you know nothing. I already have a child and my life didn't end then. It's certainly not going to end this time. I will just have a fan club with me now, wherever I go.

Oh honey, you've got some varicose veins. Just shut up and finish my pedicure.

Can you see why I want to gouge the eyes out of anyone that crosses my path? I am incredibly blessed to pregnant with a healthy baby girl. I am grateful for that, do not get me wrong.

You know what you SHOULD say to a pregnant woman? "You look great", even if she doesn't. And make sure you're handing her a cupcake while you're saying it.

Crockpot Salsa Chicken

Monday, May 13, 2013


This was a cleaning-the-cabinets kind of dinner. I thought about stuffing the chicken breast with pepperoni and mozzarella but that was a little more work than I wanted to do this afternoon. I knew I had to use the chicken breast in the next day or so. I opened the cabinet and saw the beans and salsa. The rest, as they say, is history.

I serve this with plain white rice but my son prefers to eat it with whole wheat scoop shaped tortilla chips. Whatever works!


Ingredients
1.5 lbs of boneless, skinless chicken breast
1 15oz jar of chunky salsa, any heat level
1 15oz can of black beans, rinsed
1 15oz can of corn or frozen, whatever you've got
1 tbsp of taco seasoning (I make my own)

Directions
Put chicken breasts into crockpot
Pour jar of salsa over chicken
Pour can of black beans over salsa
Pour can of corn over black beans
Sprinkle taco seasoning evenly over everything
Carefully use a spoon to push all ingredients together without moving the chicken You want everything combined and covering the chicken
Cook on low for 6 - 7 hours
Shred chicken with forks and stir well before serving

Like I said, you can present this over rice. Use orzo if you or your family aren't big fans of rice. You could also toss 2 cups of cooked rice/ pasta into the crockpot right before you serve it. You could even skip the rice/pasta, peel off a few leaves of lettuce and make lettuce wraps with them. Enjoy!

Happy Mother's Day!

Sunday, May 12, 2013


I hope all of you enjoy your day and get the break you truly deserve! If not, I hope you at least get yourself some champagne!

Throwback Thursday: DIY Chevron Crib Sheet

Thursday, May 9, 2013

Originally posted November, 11, 2012


It’s hard to not love everything that Pottery Barn Kids has to offer. That goes for Pottery Barn in general, but especially the kids stuff. After ordering a blanket from Etsy, I decided that the grey chevron sheet would be the perfect match for baby girl’s nursery. Everything was going well until the website informed me that the sheet wouldn’t ship until January 23, 2013. Sorry guys, but I’m hoping that she’s at least a month old by then!

So I turned to Etsy. The most inexpensive chevron sheet was $30 before shipping. And I wanted at least two. Yikes. Next stop was Google, where I found Carousel Designs. They have beautiful sheets, in the perfect colors and patterns…but also $29 a piece. I don’t care how much money I have available to me, I just cannot spend $30 on one crib sheet!

After pouting for a minute or two, my Mother in Law suggested that I just make the sheets. “It’s can’t be that hard, right?”

Aside from the fact that I had only turned my sewing machine on twice, ever and that I hadn’t actually created anything with it… SURE, WHY NOT? Carousel Designs also sells fabric. I ordered 2 yards of pink and 2 yards of grey. Oh. Man.

I found a bunch of tutorials online (YAY INTERNETS!) but I used this one, because I think it explains the process the best. I did a test run with fabric I got very cheap at Walmart and somehow, it turned out pretty well! It was so easy and it actually fits the crib. A Christmas miracle!


I started out by cutting the fabric down to 69″ x 47″ from 72″ x 54″. The tutorial calls for 67″ x 45″ but I wanted to give myself extra room, especially because I wasn’t going to measure anything but the initial overall size of the fabric! I also cut it with pinking sheers because I do not have a serger and I lack the patience to fold and pin and fold and sew. Lol.


Next was the edge folding. I eyeballed it but figured I’d give myself about an inch. This was so when I pulled the elastic through, it was easy and I didnt have to worry about sewing too close to the edge. Iron the folded over edge on all sides of the sheet. I then cut the 8″ x 8″ squares from the corners. I unfolded the corners for this step. I probably should have cut the corners first and then pressed the edges over. Oh well. Next time! I then went around and sewed the edges I had just cut, in order to make the pockets for the mattress.


Next, I sewed the little elastic pocket I made with the fold-and-iron technique. I used a zig zag stitch for no other reason than to match the pattern of the sheet itself. Lol. The picture above is the seam of a corner (on the left) where it meets the seam of the elastic casing.

After all of the edges are sewn, you have to add the elastic. I used the safety pin technique that’s in the tutorial. It’s easy but tedious. I used 72″ of 1/4 inch elastic, I had used 80″ in my original test sheet and thought it was a little too much and that it could be a tighter. I bought a 3 yd roll at Walmart for $.97. Once the elastic is through, sew the ends of it together and then close the opening in the casing.

You’re done!


The moment of truth: putting it on the mattress. Woo! It fits! Now it just has to be washed and dewrinkled.

2 yards of fabric: $15. ($7.50/yd)
3 yards of 1/4 elastic: $.97.

Total cost: $15.97. Just about 50% less expensive and it takes about an hour. Love!

If I can do it, anyone can. It’s also given me the itch to DIY a lot of other things. The nursery still needs curtains/ valances. Those cannot be too hard. The grey chevron sheet is up next, though.

Pictures are iPhone photos. Sorry (again)!

Apple Pie Moonshine

Sunday, May 5, 2013


Someone gave my husband a mason jar of this deliciousness and we shared it with the family during my sons third birthday party. L o l. We liked it, a lot. 2 days later, we made our own batch! I guess this is technically a hard cider since we aren't distilling the booze Dukes of Hazzard style. But, close enough. There are plenty of variations of this recipe all over the internet. Here is the one that was passed on to us!

Ingredients
1 750ml size bottle of Everclear or 190 proof grain alcohol
1 gal apple juice
1 gal apple cider
1.5 cups white sugar
1.5 cups brown sugar
8 cinnamon sticks

Directions
In a large pot, bring the juices, sugar and cinnamon sticks to a boil.
Remove from the heat and let cool to room temperature.
Once the mixture is completely cool, add the alcohol.
Transfer the liquid to sterile mason jars and divide the cinnamon sticks up between them. We used quart sized jars and it make about 9!


My Redneck wine glass - testing it out.


You can drink it immediately but it's supposed to get better after it mellows out for a couple of weeks. Be careful how much you drink...it can sneak up on you! Slainte!

Throwback Thursday: DIY Horizontal Stripes

Thursday, May 2, 2013

Originally posted October 29, 2012


After seeing this pink and white striped wall, I was obsessed with the idea. I figured that the large stripes would be a great way to get pink on the walls without having to commit to all 4 walls. I love me some pink but a whole room of it would be a little overwhelming. After stalking browsing the Pottery Barn website and catalog, I settled on grey and pink.

Like most things I do, I researched the horizontal stripes, to death. A combination of this and this helped me though the project.

I started out painting the entire wall pink because, well, pink is lighter than grey. After letting the pink paint completely dry and settle for a couple of days, I got down to measuring and taping. I did start out with a laser level but the wall was a little bumpy and the laser was only $20. Trust me when I say, this is not the best combination. I ended up just using a box level and drawing lines across the wall with a pencil. Oy. Okay, it DID go pretty quickly and I actually learned how to use a box level! Haha.

The height of the wall, from moulding to ceiling is 93″ so I used the same method as UnskinnyBoppy – 7 stripes, each 13 inches tall, with the bottom one ending up to be 15 inches. Honestly, now that the moulding is on, you cannot tell that it’s larger than the rest. Add some furniture and a cute baby….no one will notice, ever.


I got out my blue painters tape and put it right over my pencil marks. This is where your steady hand and all of your patience come into play! You want to make sure that the tape goes on the outside of the stripes that you’re going to paint with your darker color. That sounds a little confusing. If your stripes are going to be 13″ tall, make sure you’re taping it so that they end up that way. It doesn’t matter if the tape shrinks the stripes that will stay the original color…you aren’t painting those! I also used the painters tape to mark which stripes were NOT going to be painted, just to make it easier for my pregnant brain. Blue tick marks = no grey paint. Got it.

I used a credit card (Sorry, Amex) to smooth out the tape and make sure that it was completely stuck to the wall. The last thing you want is for the paint to bleed through.

THATS IT! PAINT AWAY! If you need two coats (I did), you want to do that as soon as you finish your first coat. Do not let it dry! You risk ripping the paint right off! After your second coat, pull all of that tape right off. Slowwww and steady. It takes an hour to put up and 45 seconds to pull off. It’s heartbreaking!


Now step back and admire your work. Ahhhhhh.


If there was any bleeding or peeling, I would wait until everything is dry before you go in for the touch up. I think that the measuring, lining, taping and painting took about 2.5 hours. The wall is not very big. And if I didn’t have a big belly in the way or Twitter to distract me, I probably could have finished it in under 2. I couldn’t have accomplished anything at all though, without my trusty helper. ;) (The greys are the same color, I swear!)


I’m so excited to get some furniture and linens into the room! My husband just recently put up new trim and closet doors, all in crisp white, which I love. I should also take new photos during the natural daylight. These look so dull and off color. Oh well…..maybe once it’s finished!